How to Connect Firestick to TV: Full Setup Guide
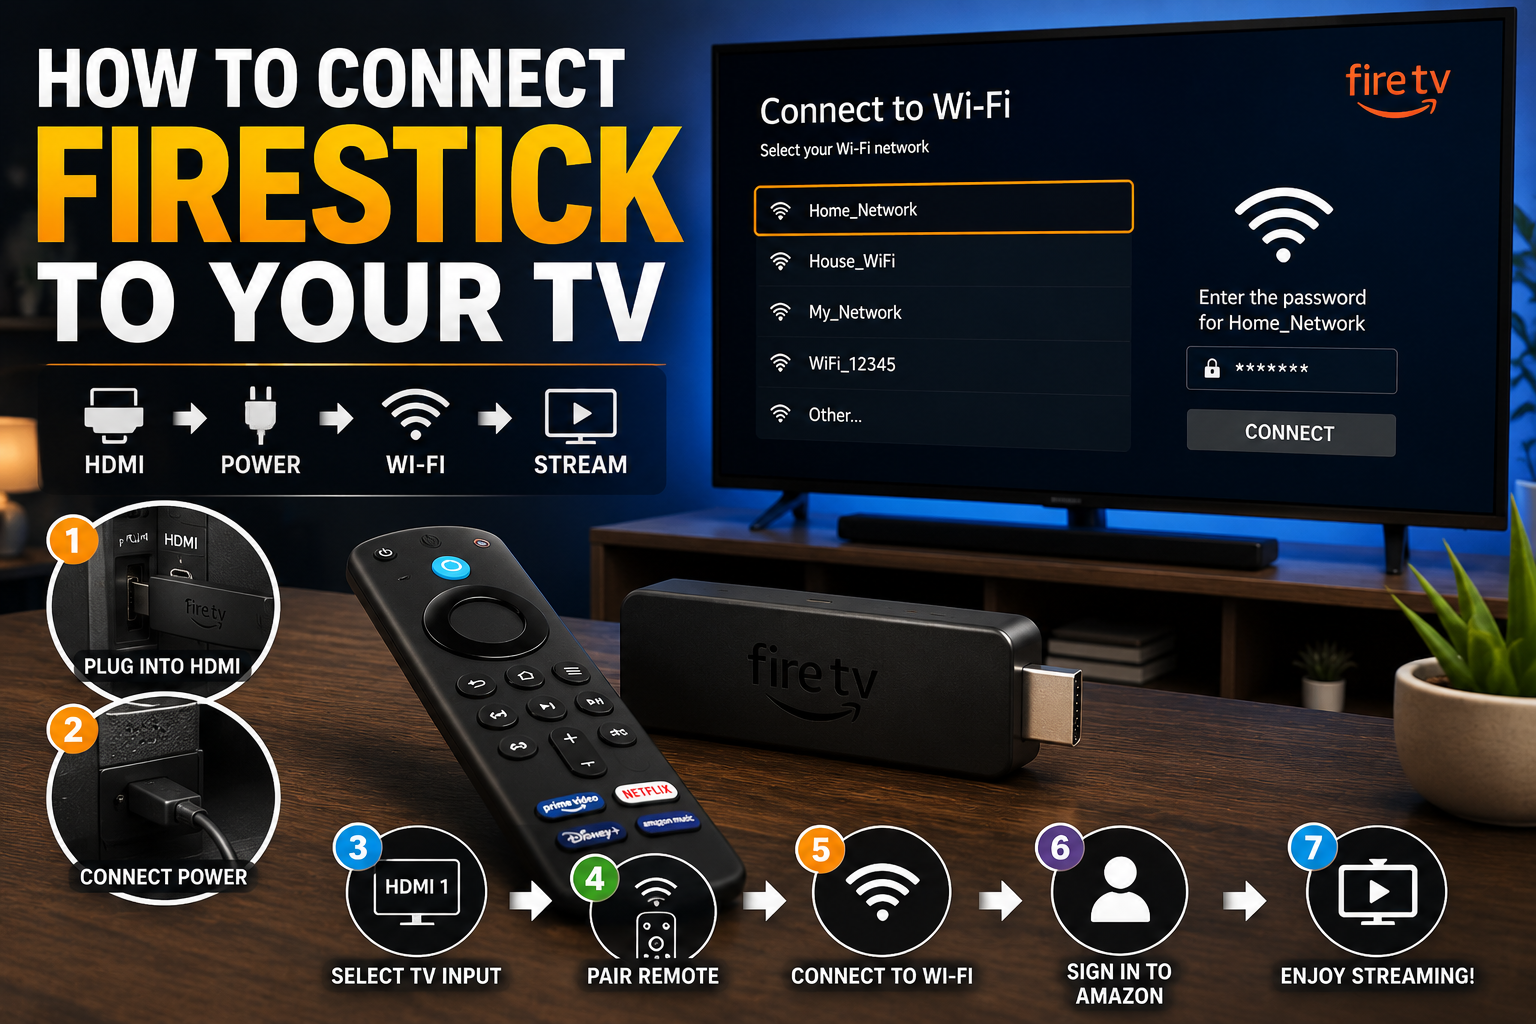
A Firestick, officially called an Amazon Fire TV Stick, turns an HDMI TV into a stream hub for apps, movies, shows, live channels, music, and more. If you want to know how to connect Firestick to TV, the basic path is simple: plug the stick into HDMI, power it from a wall outlet, switch to the right input, pair the remote, connect to Wi-Fi, and sign in to your Amazon account. This guide explains the full Firestick setup in plain language so you can go from unboxing to streaming with less guesswork.
How do you set up a Fire Stick?
Set up a Fire Stick by plugging it into an open HDMI port, connecting the USB cable to the stick and wall adapter, turning on the TV, choosing the matching HDMI input, and following the on-screen prompts. Amazon also recommends the wall adapter instead of a TV USB port, because the wall gives steadier power for setup and streaming.
Before you begin, have your Wi-Fi name, Wi-Fi password, and Amazon login ready. If the screen shows a code or QR step, keep a phone, tablet, or computer close by.
The phrase Firestick to TV sounds like a one-step job, and in a way it is. Most delays come from the wrong input, a remote that has not paired, a mistyped password, or weak power. Once those are fixed, the rest of the fire tv stick setup is mostly guided by the screen.
What comes in the box
Most packages include the streaming stick, Alexa Voice Remote, USB power cable, power adapter, AAA batteries, and an HDMI extender. Exact packaging can vary by model or region, but the purpose of each part is the same: the stick carries the streaming device, the remote controls the interface, and the power accessories keep the device running while it is connected to your TV.
The HDMI extender is easy to overlook, but it can be very useful. If the back of your TV is crowded, the HDMI ports are recessed, or the Fire TV Stick presses against the wall, the extender gives the device extra room. It can also move the stick a little farther from the TV body, which may improve wireless reception in some home setups.
Here is a simple pre-setup checklist:
- Fire TV Stick or Fire TV Stick 4K model
- Alexa Voice Remote
- Fresh AAA batteries for the remote
- USB power cable
- Power adapter
- HDMI extender, if the stick does not fit comfortably
- TV with an open HDMI port
- Wi-Fi network name and password
- Amazon account email, phone number, or login method
- Access to your phone or computer if activation is requested

Connect the Firestick to your TV
The first major step in how to connect Firestick to TV is choosing an HDMI port. Look at the back or side of your television and find a port labeled HDMI 1, HDMI 2, HDMI 3, or something similar. If your TV has multiple ports and one is easier to reach, use that one. Just remember the number, because you will need to select the same input with your TV remote.
Plug the Fire TV Stick directly into the HDMI port. If the device is too wide, too close to the wall, or blocked by another cable, attach the HDMI extender to the TV first, then plug the Fire TV Stick into the extender. This is still the same process for how to hook up a Firestick to a TV; the extender simply gives you more space and flexibility.
Next, connect the USB power cable to the Fire TV Stick. Plug the other end into the included power adapter, then plug the adapter into a wall outlet. While some TVs have USB ports nearby, Amazon’s setup instructions generally advise avoiding direct USB-to-TV power for Fire TV Stick setup, since a TV USB port may not supply steady power for the streaming device.
Once the Firestick to TV connection is made and power is connected, the device should begin to start. You may see the Fire TV logo, a loading screen, or a setup page after the TV input is selected. If the screen stays blank, do not assume the Fire TV Stick is broken. In many cases, the TV is simply on the wrong HDMI source.
Turn on the Firestick and select the right input
Learning how to turn on Firestick can be confusing because most Fire TV Stick models do not have a separate power button on the stick itself. The device turns on when it receives power from the wall adapter. Your job is to turn on the television, switch to the correct HDMI input, and wait for the Fire TV startup screen.
Use your regular TV remote first, not the Fire TV remote. Press the button labeled Input, Source, HDMI, or something similar. Choose the HDMI port where the Fire TV Stick is plugged in. For example, if you connected the stick to HDMI 2, select HDMI 2 from your TV’s input list.
If you still do not see the Fire TV screen, try these quick checks:
- Confirm the power adapter is plugged into a working wall outlet.
- Make sure the USB cable is fully inserted into the Fire TV Stick.
- Check that the Fire TV Stick is firmly connected to the HDMI port or extender.
- Switch through each HDMI input slowly and wait a few seconds on each one.
- Try another HDMI port if the first one does not display a picture.
- Restart the TV and unplug the Fire TV Stick power adapter for a few seconds before reconnecting it.
The Fire TV Stick may take a little time to boot, especially during first setup or after an update. If you see a logo and then a blank screen, wait briefly before changing cables. If there is still no picture, reseat the HDMI connection and verify the TV is not set to an inactive source.
Set up the Fire TV remote
The next step is to set up Fire TV remote control so you can move through the setup screens. Put the included batteries into the Alexa Voice Remote, making sure the positive and negative ends match the markings inside the battery compartment. In many cases, the remote pairs automatically when the Fire TV Stick starts.
If the remote does not respond, stand close to the TV and press the Home button for several seconds. Amazon’s help guidance says that if a Fire TV remote does not pair automatically during setup, holding the Home button can help start pairing. Once paired, you should be able to use the circular navigation ring, Select button, Back button, Home button, and menu controls.
The remote also becomes more useful later in setup when you configure TV power and volume controls. Many Alexa Voice Remotes can control compatible TVs, soundbars, or receivers after equipment control is configured. That means one remote may handle navigation, playback, volume, and power instead of forcing you to juggle multiple remotes.
If the remote still will not pair, try replacing the batteries, moving closer to the Fire TV Stick, removing obstacles near the TV, and restarting the Fire TV Stick by unplugging it from power. Avoid pressing too many buttons at once while pairing. Give the remote time to connect before repeating the process.
Complete the on-screen Firestick setup
Once the remote works, the Fire TV interface will guide you through the remaining fire stick setup process. You will usually choose a language, connect to Wi-Fi, sign in to your Amazon account, and decide whether to restore apps or settings from a previous Fire TV device if that option appears.
Connect to Wi-Fi
Choose your home Wi-Fi network from the list on screen. Enter the password carefully with the Fire TV remote. Wi-Fi passwords are case-sensitive, so uppercase and lowercase letters matter.
Some Fire TV setup screens may offer a QR code option that lets you continue setup from a phone. If you prefer not to scan the code, choose the manual option and proceed with the remote.
For the strongest connection, place your router in an open area if possible and avoid hiding the Fire TV Stick behind heavy objects or dense furniture. If your TV is mounted far from the router, the HDMI extender may help slightly by moving the stick away from the back of the television.
Sign in to your Amazon account
After Wi-Fi is connected, sign in with your Amazon account. Depending on the model and software screen, you may enter your details directly on the TV, scan a QR code, or visit an activation page on another device and enter the code shown on the screen. Follow the prompt that appears on your TV rather than guessing, because the exact flow can vary by device.
If you bought the Fire TV Stick from Amazon using your own account, it may already be associated with that account. Even then, you may still be asked to confirm details, choose preferences, or accept setup prompts. If it was purchased as a gift or from another retailer, you will likely need to sign in during setup.
Choose privacy, parental, and app options
During setup, Fire TV may ask about parental controls, app downloads, data preferences, or profile choices. Read each screen before clicking through. Parental controls are helpful if children use the TV, while app selection screens can speed things up by installing common streaming services immediately.
You do not have to install every app during first setup. If you are unsure, start with the services you actually use. You can always download more apps later from the Fire TV app store.
Configure Fire Stick settings for a smoother experience
After the basic firestick setup is complete, take a few extra minutes to configure Fire Stick settings. This is where the device starts to feel less like a new gadget and more like part of your living room. Small choices, such as remote power control and display settings, can make daily use easier.
Start with the settings menu from the Fire TV home screen. Look for categories such as Network, Display & Sounds, Equipment Control, Controllers & Bluetooth Devices, Applications, Preferences, and My Fire TV. The names may vary slightly depending on your model and software version, but the overall idea is the same.
Set up equipment control
Equipment control helps your Fire TV remote manage compatible TV power, volume, and sometimes audio equipment. If the setup wizard offers this option, follow it while your TV, soundbar, or receiver is turned on.
The process usually asks you to confirm your TV brand and test whether the remote can change volume or power. If the first test fails, continue through the prompts because Fire TV may try another control profile. When it works, you can use the Fire TV remote for everyday viewing instead of reaching for the TV remote every time you need to adjust sound.
Enable Amazon Fire TV CEC control when useful
Amazon Fire TV CEC control relies on HDMI-CEC, a feature that lets connected HDMI devices send certain control signals to each other. When HDMI-CEC is enabled, your Fire TV remote may be able to power the TV on, switch inputs, or coordinate basic controls with compatible equipment. Amazon notes that HDMI CEC and HDMI ARC settings may need to be enabled for some Fire TV features, and that the names for HDMI-CEC vary by TV brand.
The tricky part is that each TV brand uses its own label. Samsung may call it Anynet+, LG may call it SIMPLINK, Sony may call it BRAVIA Sync, Panasonic may use names such as VIERA Link, and many TVs simply call it CEC. If you cannot find it, search your TV’s settings under system, external device manager, inputs, HDMI, or general device control.
Turn on CEC if you want the Fire TV Stick and TV to work together more smoothly. Leave it off if it causes unwanted behavior, such as the TV changing inputs suddenly. CEC is convenient, but it is not required for basic streaming.
Adjust display and audio settings
Most users can leave display and audio settings on automatic. However, if the picture looks stretched, too dark, or not as sharp as expected, open Display & Sounds and review the available options. Your TV, HDMI port, cable path, and Fire TV model all influence what settings appear.
For audio, check your TV or soundbar setup before changing advanced settings. If you use a soundbar or receiver, make sure it is connected correctly and selected as the active audio output on the TV. Then test a streaming app you use often, because real playback is the best way to confirm sound and picture feel right.
How to install apps on a Fire TV Stick?
To install apps on a Fire TV Stick, open the Fire TV home screen, use search or the app store area to find the service you want, select the app, and choose the download or get option. Once installed, the app appears in your apps section, where you can open it, sign in, and begin streaming if you have an active account or subscription for that service.
This part of how to install a Fire Stick is different from physically installing the device. The hardware installation gets the Firestick connected to your TV. App installation adds the streaming services, music apps, fitness apps, browsers, and other tools you actually want to use.
A practical first-app checklist might include:
- Your main paid streaming services
- Free ad-supported streaming apps you enjoy
- Live TV or cable replacement apps, if you subscribe to one
- Music or podcast apps
- Fitness or learning apps
- A browser, if available and useful for your needs
- Any provider apps included with your internet, phone, or TV plan
Do not overload the device with apps you will never open. Keeping your app list lean makes the home screen easier to navigate and may reduce clutter. If you try an app and do not like it, remove it later from the applications area in settings.

How to use Fire TV Stick after setup?
You use a Fire TV Stick by moving through the home screen with the remote, opening apps, searching for titles, using voice commands when available, and managing settings from the Fire TV menu. Once the fire tv stick setup is complete, the device works like a streaming dashboard: choose what you want to watch, press Select, and use the playback controls to pause, rewind, fast-forward, or return home.
If you are wondering how to use Fire TV Stick efficiently, start with the Home button. It brings you back to the main screen from almost anywhere. The Back button returns to the previous screen, while the Menu button usually opens extra options for the highlighted item.
Voice search can save time. Press the microphone or Alexa button on a compatible remote, then ask for a movie, show, actor, genre, app, or general command. Voice results may vary depending on subscriptions, app availability, and regional settings, but it is often faster than typing with the on-screen keyboard.
For everyday use, remember these basics:
- Press Home to return to the main Fire TV screen.
- Use the navigation ring to move around the interface.
- Press Select to open a highlighted item.
- Use Back when you want to leave a menu or return to the previous screen.
- Hold or press the voice button to search by speaking.
- Open Settings when you need Wi-Fi, display, app, remote, or account options.
- Use the apps area to find installed services quickly.
Learning how to use a Fire Stick is mostly about building muscle memory. After a few sessions, switching apps, searching, and adjusting settings becomes natural.
Practical tips for first-time users
The first day with a new streaming device can feel busier than expected. You may be signing in to several apps, testing volume control, and learning where settings live. These small tips make the process easier.
Label the HDMI input
If your TV allows input labels, rename the port to Fire TV, Firestick, or Streaming. This prevents confusion later, especially if you also have a game console, cable box, Blu-ray player, or sound system connected. The next time someone asks how to work a Firestick, you can simply tell them to choose the labeled input.
Keep the TV remote nearby during setup
Even after you set up Fire TV remote controls, the original TV remote is useful. You may need it to change inputs, enable CEC, adjust picture settings, or manage audio output. Once everything is configured, the Fire TV remote may cover most daily actions.
Use the wall adapter
If your Fire TV Stick shows low power warnings, restarts suddenly, or fails to load properly, check the power source. A wall outlet is usually more dependable than a TV USB port. This is one of the easiest setup mistakes to fix.
Write down the Wi-Fi details before starting
Typing with a streaming remote can be slow. Having the exact Wi-Fi password nearby reduces errors and frustration. If the password includes symbols, uppercase letters, or similar-looking characters, double-check them before submitting.
Organize apps after installing them
Once your main apps are installed, move your favorites to a convenient position if your Fire TV interface allows it. Put the services you use daily near the front. A clean app row makes the device feel faster because you spend less time searching.
Troubleshooting common setup problems
Even a straightforward setup can hit a snag. The good news is that most Fire TV Stick problems during installation are caused by a short list of issues: power, input selection, remote pairing, Wi-Fi, or account sign-in. Work through them one at a time instead of changing everything at once.
No signal or blank screen
A blank screen usually means the TV is not showing the HDMI port where the Fire TV Stick is connected. Press Input or Source on your TV remote and select the correct HDMI number. If that does not work, unplug the Fire TV Stick from power, wait briefly, reconnect it, and give it time to restart.
Also check whether the HDMI extender is firmly seated. If the stick is loose, the TV may not detect it. Try another HDMI port if your TV has one available.
Fire TV remote not responding
If the remote does not work, start with the batteries. Remove them, reinsert them correctly, or replace them with a fresh pair. Then hold the Home button near the TV to encourage pairing.
If the remote pairs but behaves unevenly, reduce interference around the TV area. Large electronics, crowded cabinets, and weak batteries can all make troubleshooting harder. Restarting the Fire TV Stick can also refresh the connection.
Wi-Fi network not found
If your Wi-Fi network does not appear, move the router and Fire TV Stick closer if practical, or restart your router. Make sure the network is not hidden. If you use separate 2.4 GHz and 5 GHz network names, try the one that gives the best mix of range and speed in that room.
When the network appears but the password fails, re-enter it slowly. Watch for uppercase letters, spaces, and special characters. If other devices also cannot connect, the issue may be with the network rather than the Fire TV Stick.
Amazon account sign-in issues
If you cannot sign in, confirm that the email address or phone number is correct. If the screen shows an activation code, enter it exactly as shown on the device the prompt asks for. Codes can expire, so request a new one if needed.
Two-step verification can add one more step. Keep your phone nearby in case Amazon sends a code. If the account belongs to another person in the home, ask them to finish sign-in.
App download or playback problems
If apps will not download, confirm that the Fire TV Stick is online. Restart the device and try again. If one app fails but others work, the issue may be with that app or service.
For playback problems, test more than one app. If every app buffers, focus on Wi-Fi strength and internet speed. If only one app buffers, check that app’s settings or subscription.
Fire TV Stick setup for older TVs
Older TVs can still use a Fire TV Stick as long as they have an HDMI port. The steps for how to install Fire TV Stick are the same: plug into HDMI, connect power, select the right input, and follow the on-screen prompts. Older TVs may just have fewer ports, lower resolution, or fewer HDMI control features.
If your TV has one HDMI port and it is already used, you may need to swap cables or use an HDMI switch. If the TV only supports 720p or 1080p, a 4K stick will still work, but the picture is limited by the TV.
Very old TVs without HDMI need extra gear. Fire TV Stick devices are built for HDMI, so a converter is only a backup. A TV with a native HDMI input is the better choice.
Firestick setup for travel or a second room
A Fire TV Stick is small enough to move between rooms or take on a trip. In a new room, you usually only need to plug it into HDMI, connect power, and select the right input. Since the device already knows your home Wi-Fi and Amazon account, it may be ready fast.
Travel can be less predictable. Hotel, dorm, and shared networks may use sign-in pages, device limits, or security rules that complicate streaming devices. Bring the power adapter, HDMI extender, and remote so you are not relying on parts from the room.
When using a Fire TV Stick away from home, consider these points:
- Check whether the TV has an accessible HDMI port.
- Bring the original wall adapter and cable.
- Keep the remote in the same bag as the stick.
- Know the Wi-Fi login process before settling in.
- Sign out of sensitive apps if you are using a shared or temporary space.
- Avoid leaving the device plugged into a hotel or guest room TV when you leave.
Moving the device is simple, but streaming rights, app availability, and network rules can vary by location. If an app behaves differently while traveling, the issue may not be the Fire TV Stick itself.
Keeping your Fire TV Stick organized
Once setup is done, organization becomes the difference between a device people enjoy and one that feels cluttered. Review installed apps every so often and remove what you do not use. Keep favorite services easy to reach, and update sign-ins when passwords change.
Profiles can also help if multiple people use the same Fire TV Stick. They make it easier to separate watchlists, recommendations, and viewing habits where supported. If children use the TV, revisit parental controls and app access rather than relying on default settings.
Storage matters too. Streaming sticks have limited internal space, and too many apps can make management annoying. If the device warns you about storage, uninstall unused apps first. Clearing app cache may also help in some cases, but removing unnecessary apps is usually the cleaner fix.
A simple setup recap
If you came here searching for how to set up Firestick, the short version is this: plug it into HDMI, connect it to wall power, turn on the TV, choose the right HDMI input, pair the remote, connect to Wi-Fi, sign in to Amazon, and install your streaming apps. That sequence covers the key fire tv stick how to connect steps from hardware to home screen.
Here is the full recap in order:
- Insert batteries into the Fire TV remote.
- Connect the USB power cable to the Fire TV Stick.
- Plug the stick into an open HDMI port on your TV.
- Use the HDMI extender if the stick does not fit well.
- Plug the power adapter into a wall outlet.
- Turn on the TV with the TV remote.
- Select the HDMI input that matches the Fire TV Stick.
- Pair the Fire TV remote if it does not pair automatically.
- Choose your language and Wi-Fi network.
- Sign in to your Amazon account.
- Follow any activation, update, or preference prompts.
- Configure equipment control for TV power and volume if desired.
- Install your favorite streaming apps.
- Test playback, sound, and remote controls.
Whether you call it how to install Firestick, how to set up Fire TV Stick, or simply setup Fire Stick, the process is manageable when you handle one step at a time. The most important details are using the correct HDMI input, giving the device steady power, and following the on-screen prompts carefully.
A Fire TV Stick is designed to be easy to use, even if you are not especially tech focused. Once connected, it gives you one place to open streaming apps, search for entertainment, and control playback from the couch. Take a few minutes to configure the remote, Wi-Fi, apps, and CEC settings now, and daily streaming will feel easier later.
Q&A
Question: Can I power a Fire TV Stick from my TV’s USB port instead of the wall adapter?
Short answer: It is better to use the included wall adapter. Some TV USB ports do not provide steady power, which can cause setup failures, low power warnings, restarts, blank screens, or spotty streaming. A wall outlet is the more dependable option for setup and everyday use.
Question: What should I check first if the Fire TV Stick shows a blank screen or no signal?
Short answer: Start by confirming that the TV is set to the same HDMI input where the Fire TV Stick is connected. Then check that the stick is firmly plugged into the HDMI port or HDMI extender, the USB power cable is fully inserted, and the wall adapter is connected to a working outlet. If needed, try another HDMI port and restart the Fire TV Stick by unplugging it briefly.
Question: Why is the HDMI extender included, and do I have to use it?
Short answer: You do not have to use the HDMI extender if the Fire TV Stick fits comfortably in your TV’s HDMI port. The extender is helpful when ports are recessed, crowded, too close to a wall, or blocked by other cables. It can also move the stick slightly away from the TV body, which may improve wireless reception in some setups.
Question: What information should I have ready before starting Fire TV Stick setup?
Short answer: Have your Wi-Fi network name, Wi-Fi password, and Amazon account sign-in details ready. If the setup screen shows an activation code or QR code, keep a phone, tablet, or computer nearby so you can complete the sign-in or activation step without interrupting setup.
Question: Can a Fire TV Stick work with an older TV?
Short answer: Yes, as long as the TV has an available HDMI port. The setup steps are the same: connect the stick to HDMI, plug it into wall power, select the correct input, and follow the on-screen prompts. However, an older TV may limit picture resolution or lack HDMI-CEC features, and TVs without HDMI usually require extra conversion equipment.